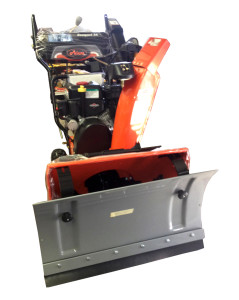
Congratulations on purchasing a Slush Plow. This attachment for your new snow blower will push snow and slush. The attachment is easy to install, just follow the instructions that have been provided for you. Please make sure the size of the plow is larger than the blower housing. If the plow is smaller than the blower housing, please return and purchase the correct size plow. Please be aware the snow blower must have a transmission for this attachment to work. The transmission must be in good condition for the attachment to work. If the transmission slips, take it to a repair shop for a simple fix or adjustment. WARNING engine must be turned off when installing and uninstalling plow.
INSTALLATION
(Note that some models have holes pre-drilled from the manufacture. Toro, MTD, Cub Cadet, Sears, Troy Bilt, Simplicity, Snapper (do not have pre-drilled holes). Ariens models only have these holes. If the holes line up with the brackets you can accommodate those models or you must drill new holes and follow the instructions.)
Steps:
Measure the height of the blower housing. If less than 20″ please contact us, the company will switch out the brackets for the smaller ones.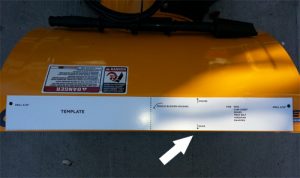
1) Assemble shown on picture.
2) Place plow in front of snow blower make sure it’s place equally from both sides. Take template that has been provided for you, place it at the edge & middle of the housing and mark your holes.
3) Cut the red dotted line off the template. Place on blower on the edge. Then drill a 5/16 hole.
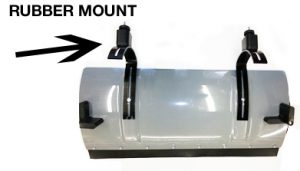
4) Mount your brackets underneath the blower housing with your bolt and large rubbers. Rubber mounts have two different face, oval and flat. The Oval side on top of the bracket. The flat side on the bottom of the snow blower. Rotate the rubber on the top of bracket until the correct position is achieved. Look at picture.
5) Place knobs on top of the housing and tighten the brackets to the correct angle of the plow. Adjust the height of the squeegee so it hovers flat from the ground. ( Note plow should be angled 90 degrees from the ground ).
 6) Place the two angling (L shape) rubbers on the housing and adjust where the plow touches the housing. The rubber is to protect the snow blower and the plow. Also, functions has a angling device.
7) Both Tires must be in a lock position at all times when using plow.
If you have any question you can call 1.516.806.7512 or Email: [email protected] or watch the Youtube Video for installation.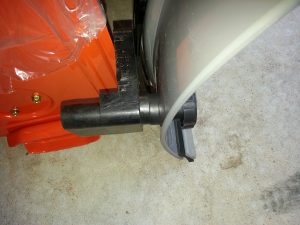
8) Very Important to loosen all 6 knobs rotate plow. Allows rotation much easier.
Snow Plow Chart |
|||
|
|
SNOW BLOWER SIZE |
PLOW SIZE |
|
| 24″ | 30″ | ||
| 26″ | 34″ | ||
| 27″ | 34″ | NOTE: FOR HUSQVARNA PLOWS WILL ONLY FIT 27” SNOW BLOWERS AND UP | |
| 28″ | 34″ & 38″ |
||
| 30″ | 38″ | ||
| 32″ | 38″ | ||
| 33″ | 38″ | ||
| 36″ | 48″ | ||
| 38″ | 48″ | ||
| 45″ | 48″ | ||